Friday, December 16, 2011

myIPOD

Day 1 - Sketch

Final Design
Day 2


For this project we had to create an Ipod and skin for it in Adobe Illustrator CS3. We were to make it as realistic as possible and create a custom skin. My final product is a winter themed Ipod nano. I created the igloo using lines and made it a brighter white color to contrast with the blue background. The igloo spans around the Ipod, it can be seen from the front, the side, and the back. To go along with the winter theme, I made snowflakes in a variety of sizes and placed them around the surface of the Ipod. My final design accurately represents my sketch in that it has almost all of the components I originally drew.

Monday, December 12, 2011

MySpace

Day 3
Sketch
Day 2
Final Design
In this project we were to use the lamp that we created in the previous project and create a space for it using Adobe Illustrator CS3. Once again, we used different 3D effects in order to make our space and objects look more realistic. The lamp that I created before was a birdcage, I got inspired by vintage European furniture. To go along with the lamp, I created a dress form, a vanity table, and a chair. Using gradients on the area around my lamps, I made it look as though they were on and giving off a soft glow. Using the Bevel & Extrude effect, I was able to make the vanity table have a more three dimensional shape as well as the little jewelry box. The dress form and chair were given there shape and smooth texture by using the Revolve effect. My final design, for the most part, accurately represents my sketch. The added details were the shadows of the furniture in the room and the jewelry box with its reflection in the mirror.


Tuesday, December 6, 2011

myLAMP


Sketch
Day 1
Day 2 - Final Design

For the myLAMP project we were to create a three dimensional lamp of our own design using the 3D Revolve effect in Adobe Illustrator. We had to create our own unique design for our lamps, something people may have never seen before. My final design was a bird cage, the light bulb being suspended by wires to look like a bird on a perch. I used different lines and art mapped them to the different sections of the cage to create the bars. Instead of making the whole cage shape at once, I found that I had to make the top part separately in order to have the bars properly aligned. Overall, my final design does accurately represent my sketch. The only real difference is the light bulb, at first it was just floating there in my sketch then I added the perch.

Tuesday, November 29, 2011

Emotions

*Absent on Day 2 due to field trip
Day 3
Day 4
Final Design
Revised Colored Design
This project was different from the ones we've previously done in that it was a group project. We were each given a specific emotion and, using minimalism and symbolism, were to create an icon that represents that emotion. My emotion was joy.  Joy is the emotion of great delight or happiness caused by something exceptionally good or satisfying. For my design, I thought of things that brought me joy then things that could bring joy in general. I create a gift box, drawing inspiration from the phrase "Joy is a gift." I used line to create the shape of the box as well as the ribbon trim. By keeping the shapes proportional, I hoped to create some symmetry. My final design resembles my sketch in that the box is at the same angle and includes the ribbon. The difference is that in my sketch the top of the box is leaning against the side and you can see into it.

Wednesday, November 16, 2011

StillPHOTO

Sketch

Day 2


Day 1
Day 3                                      

Final Project


In the StillPHOTO project we were to fuse a still-life photo with a digital image we created ourselves. We were to use Adobe Illustrator CS3 to create an object and make it look as realistic as possible in our photo.  My final project was a ship sinking into the ground where a temporary classroom used to be. Using gradients with different color values I made the ship look more three dimensional. I created a smooth texture using the gradients as well, like the side of a ship would be. To add to the realism, I created a shadow porportional to the ship, as if the sun was shining upon it from the left. In order to bring more unity to the picture, I added a fissure to the ground for the ship to be sinking into instead of sinking away into nothing. My final product does accurately represent my sketch in that I drew the ship from the same angle. The shadow and fissure are added features however.

Wednesday, November 9, 2011

Tessellation

Final Product
Day 2
Day 1
Day 3

In the Tessellation project we were required to create our own tessellation design in Adobe Illustrator CS3. The technique was used in our previous project, the color wheel. My final product was inspired by one of my favorite pokemon, Sneasel. I included a snowflake since it is an ice type, as well as its signature feather like appendages. I used the colors of the actual pokemon, changing the dark blue to a lighter teal to create more constrast with the pink of the feathers. The original pannel was repeated to create the base hexagon as well as the "petals" around the edge. My final product does accurately represent my sketch in that it is almost identical except for a few details.

Color Wheel


First/Last Day
  
In this one day project, we were to create a color wheel using Adobe Illustrator CS3. We used the Line Segment tool, Rotate tool, and the Live Paint Bucket tool. We were to use the directions given to create a wheel similiar to the one in the tutorial. The repetition of line segments divided the outer most circle and the triangle. The different secondary and intermediate colors surrounded the primary ones within the triangle in the middle. Since it was a one day project, we weren't required to make a sketch.

Wednesday, November 2, 2011

Watermark Logo

Day 1 - Sketch 
Day 2
Day 3 - Final Design
In this prject were to create a logo that represents ourselves to use as a watermark for our future projects. As with the other logo project we've done, it was to be made in Adobe Illustrator. But unlike that project, we were to keep this logo black and white. My final project included a penguin, the letters L and J, and the sun from the Filipino flag. I used a penguin because it's my favorite animal and one that my friends associate with me. Lj is a nickname that a good friend of mine gave me a while back and it stuck. Those two elements were in the center of the logo, emphasizing them. The rays of the sun come from the Filipino flag, repeating them gave my piece variation. I made sure the lines that made up the rays were straight and symmetrical. My final design ended up being a combination of two sketches I came up with, a penguin and the sun with my nickname in the middle.

Tuesday, October 25, 2011

TypoSCENE

Day 1

Day 2
Day 3
Day 4 - Final Design


In the TypoSCENE project, we were to use Adobe Illustrator CS3 to create a scene using typography. We were to incorporate the object from the previous project and place it into a scene. To create this we were to once again use the envelope distort option to make the objects via the pen and type tool. Adding onto the previous project, we had to use color.
For my project I chose to create a portion of a room, consisting of a bed, the floor, and the phone I created in the other project. The phone is now colored and placed ontop of the bed, being charged. To create more contrast and variation, I decided to have one corner of the comforter folded over instead of just laying flat on the bed. By creating a curvier shape, I was able to mimic the way an actual blanket would fold, making it look more three-dimensional. I used different shades of blue on the phone to make it accurately represent my sketch. I also decided to make the flower details on the comforter, though I should have made them in a more vibrant color to contrast them with the darker background color.

Tuesday, October 18, 2011

Art Show


Day 2
Day 3


Day 4
Day 5 - Final Product


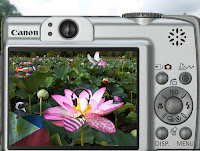
This project is different from ones we've done so far, this one we had almost complete freedom over in terms of what we could do. We were to create our pieces using either Adobe Photoshop CS3 or Adobe Illustrator. In this project we were to combine the skills used in previous projects to create a cohesive piece.
For my final project I decided to do a form of a collage, using different elements that represented me. It is a scene with a lotus flower being viewed through a camera. Using different animal print, I manipulated the patterns to make it look as if they were on the petals of the flower themselves instead of just ontop. I did the same thing with the Filipino flag on one of the leaves. In the background you can see a few objects integrated with the leaves. By changing the value or opacitiy of certain things, like the patterns, I tried to make everything more cohesive and as though the objects I added in were actually part of the scene captured by the camera. With the lighting in the picture, the main focus was the lotus blossom. To give it more emphasis, I decided that that was where I'd try to add in more details. My final product does accurately represent my sketch in that I was able to recreate many aspects of it, such as the scene being within the camera screen and having the flower be the main focus. There were more details in my final product however.

Monday, October 10, 2011

Zombify!

Day 2


Day 1


Day 3 - Final Project


In the Zombify project, we were expected to create a zombie/horror version or our picture in Adobe Photoshop CS3. We were to apply different textures and gory affects to make ourselves appear dead and have our background match appropriately. In my final project I had used bloodshot zombie eyes and a peeling paint texture to make it appear as if my skin was rough and cracked. The different bruises, wounds, and use of blood added to the whole effect of making me seem dead. By darkening the rest of the background I brought emphasis to me. To give the picture harmony and unity, I added effects to parts of the picture other than my face. By keeping the handprints and blood splatters a relatively smaller size, I made sure to keep things proportional. For this project, we weren’t required to draw sketches so my final project doesn’t have anything to represent.

Monday, October 3, 2011

TypoObject


Day 1 - Sketch
Day 2

Day 4

Day 3

Final Project


In the TypoOBJECT project, we were to continue to use Adobe Illustrator CS3 to create a composition exploring typography. In this particular project, we were to use the envelope distort option to create an object of our choice via the pen and type tool. As with other, projects, our document was to be 8.5 x 11 inches and we could only use one font. But in this project we weren't allowed the use of color, instead we had to experiment with the opacity of different aspects of our projects.
Each part of the object we chose had to be made using the object's name or the name of its different parts. For my project I chose to do a phone, specifically my own phone. I made sure to include the many details such as the keypad, speaker, and other various buttons. The repetition of the various words create the illusion of a solid object, when in fact, its multiple words formed in a shape. By changing the opacity of the different layers, I created contrast and changed the value of the different parts. I was sure to make the different parts of the phone, such as the screen and buttons proportional to stay true to my sketch as well as the actual object. My final project does represent my sketch in that they’re both at the same angle and that my project includes all the details seen in my sketch.

Thursday, September 22, 2011

Typeface Art


Typeface Art - Sketch: Camera

Final Design


The Typeface ART project is very similar to a project we've had to do last year in CG1, Word Animal. In the Typeface project, we were to pick either an animal or object to recreate using only the letters within its name. This time, however, we would be working in Adobe Illustrator CS3. Another difference is that we weren't allowed to transform the letters like in the other project. Each letter had to stay in their original shape, the only changes we could make were their angle.
I chose to do an old fashioned camera. The most difficult part of my particular project was the details, such as the buttons. Since we weren't allowed to transform the letters, getting the curves of the buttons and the camera itself were a challenge. The overlapping of the Ms helped create the texture on the body of the camera. The colors used, specifically the ones of the front features, created some dimension and brought emphasis to those parts since they would be reflecting light on a real camera. My final product accurately represents my sketch in that I was able to create most the little details. The one thing that varied between the two was the angle at which the lens was positioned.